This post contains affiliate links. That means I may earn a small comision if you click on a link and purchase something. This cost you nothing. Read all the legal boring stuff here..
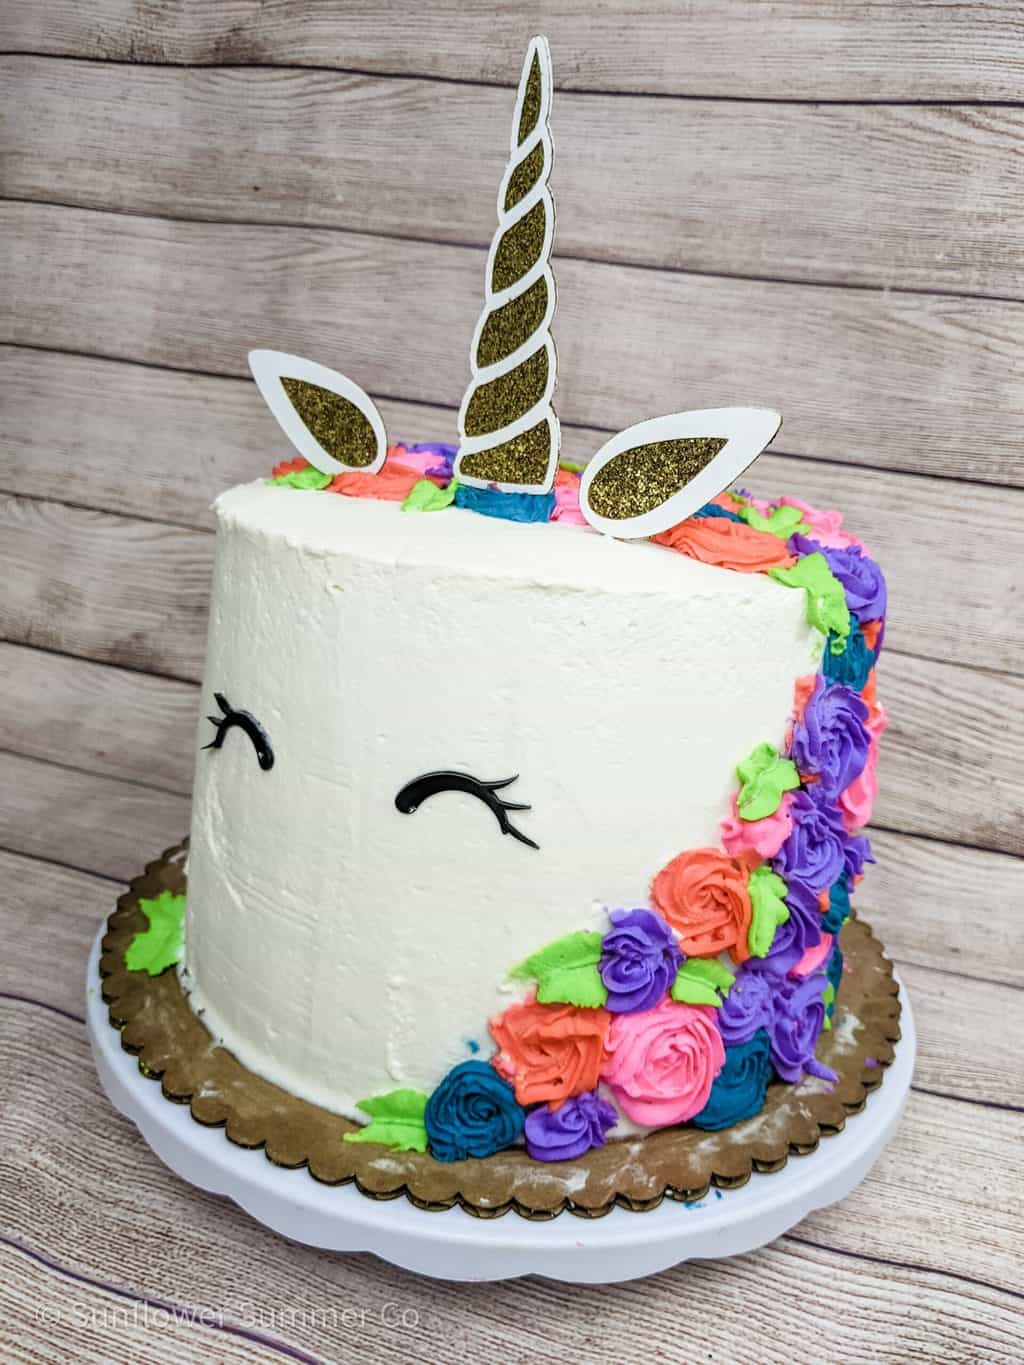
I had a rainbow unicorn-themed birthday party for my daughter and wanted to make her cake myself.
As a first-time cake decorator, I had some of the tools and know-how to create a beautiful cake, but I didn’t want to spend hours making all the decorations from scratch.
It would be much easier if someone could just give me a unicorn horn cake topper SVG so I could just cut one out with my Silhouette!
So I decided to design this unicorn horn cake topper myself to save some time putting the cake together.
So pull out your
Materials:
- toothpicks
- glitter cardstock
- spay adhisive
- white cardstock
- heavy duty duble sided tape
- free unicorn horn cake topper SVG file
Step 1: Cut out your pieces
You will need to cut the yellow pieces out of glitter cardstock and the white pieces out of white cardstock.
I included the eyes but I couldn’t think of something a
Step 2: Apply double sided tape to the back of the ears piece
Flip the glitter ear shape over to the back and apply strong double-sided tape.
I found that the tape worked much better than the spray adhesive.
Step 3: Add the toothpick at an angle
Decide what direction you want the ear to lean and add the toothpick so the ear will tilt at that angle.
Step 4: Sandwich the ear with the white ear shape
Take the white cardstock that is the same shape as the glittery ear you are working on and line up the edges.
Sandwich the toothpick between them. Be sure the white paper is stuck down well.
Step 5: Apply spray adhesive to the ear with cut out
Apply the spray adhesive to the back of the ear piece with the hole in it.
Apply it to the front of the ear with the glitter.
You should now have one ear done!
Step 6: Repeat with other ear
Repeat with the other ear but have it tilt to the other side.
Step 7: Add tape to the back of the horn
Apply double sided tape to the back of the glittery horn shape.
Step 8: Add the toothpick
Add the toothpick to the middle of the horn. Make sure it is straight up and down.
Step 9: Sandwitch with paper make sure to line it up
Sandwich the horn between the second white piece of paper shaped like the horn.
Make sure you line up the edges.
The horn is not symmetrical so flip the white horn shape if it doesn’t line up.
Step 10: Apply spray adhesive to the horn shape
Apply the spray adhesive to the back of the horn shape with cut outs.
Before you spray, make sure you are spraying the correct side. The horn isn’t symmetrical.
Step 11: Add the horn to the glitter paper
Line up the edges of the horn and press down.
Step 12: Let it dry
Let it dry for a couple a minutes before you add the unicorn horn and ears to your birthday cake.
Step 13: Decorate your cake
Add lots of rainbow-colored frosting to your unicorn cake and add your newly made unicorn horn.
Now you have your rainbow unicorn cake for your little girl’s birthday.
Step 14: Eat your cake!
Now to the best part, serve yourself or your kid’s friends some of your cute unicorn cake. But be sure you don’t eat your DIY unicorn horn cake topper. ;)
A unicorn horn cake topper is a fun decoration for any birthday, and it’s easy to make!
Use a
The finished project will make a great birthday decoration for your daughter’s or friend’s birthday cake!
Now go out and have fun with this cheap, yet amazing decoration!
If you want to download this free unicorn horn cake topper SVG, sign up below and it will be sent right to your inbox.