This post contains affiliate links. That means I may earn a small comision if you click on a link and purchase something. This cost you nothing. Read all the legal boring stuff here..
Sometimes, it’s hard to find the right stamp for your needs. You might not be able to find the design you’re looking for. Or you just have a laser and you are wanting to just make it yourself.
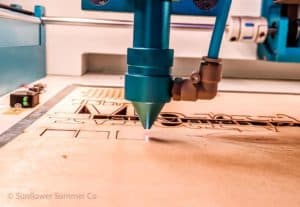
With a Thunder Laser and some laser safe rubber, you can create any stamp you want easily and quickly. You can prep your design quickly in Lightburn and start engraving within minutes.
Creating custum rubber stamps seems daunting at first but it is one of the easier things I have done with my laser once I got my settings. Now if I want a stamp, I can easily have one in 5 minutes.
What you’ll need
- Laser Safe Rubber for Stamps
- Tack It Over & Over Glue
- Acrylic or wood for mounting
- Ink
- Toothbrush
- SVG File
- Thunder Laser Engraving Machine
If you are finding you are needing lots of designs, I really love my subscription to Creative Fabrica. It makes finding an SVG or font for my project super easy. You can download as many files and fonts as you want with your subscription.
It has saved me a ton of time designing and it saves me money instead of buying all of my files individually.
Never buy SVG files again with a Creative Fabrica Subscription.
The process
Find Cut settings
Before you cut out the stamp, it is a really good idea to do a test engrave to find the settings for your laser for stamp engraving.
Go to Laser Tools>Materials test
Then go to Edit Material Settings and set it to fill. This will engrave instead of cut your test squares.
Now set up your min and max parameters you would like to test so see how much speed and power you will need.
You want to engrave deep enough that the stamp portion is raised. I found the results looked best with only one pass.
I started with 400mm/s and 80 power but the little details would sometimes get lost.
This is what I found worked well on my Nova 24, 60 watt laser and this rubber stamp sheet-
Engrave
- Speed 300mm/s
- Power: 75
- Low air and wide nozzle
- Passes 1
- *Focus Height 5mm*
Cut
- Speed 15mm/s
- Power 60%
- High air
- Passes 1
Set up your design
Setting up your design in Lightburn is a pretty straight forward process. Drag and drop your file into the lightburn canvas.
Once you have the design set up exactly how you will want the stamp to look, select and mirror you design.
Now in the same color as the design draw a rectange around your stamp design making sure it is larger than the stamp.
Place the rectangle behind the design and it will automatically invert the engrave.
Hint: If your shapes are not filled in on your screen, make your you have the color set to fill. If it still isn’t filling in, go to Window>Filled/Smooth. This will fill in shapes that are set to fill.
Copy the rectangle you placed behind the image then go to Edit>”Paste in Place”.
You now have 2 rectangles behind the design. Select one of them and change the color to black. Set black to the mode “line” so it will cut instead of engrave.
Be sure that the cut layer is under the engrave layer so the stamp engraves first then cuts.
Hint: “Invert” in the preview window will not actually change how the Thunder Laser cuts.
Engraving your Stamp
Now comes the fun part, engraving your rubber stamp with your Thunder Laser.
Place your rubber in your Laser and set the focus to 5mm above the top the the rubber.
I found that defocusing the laser really helped the rubber stamp cut better.
Set your engrave and cut settings and start cutting.
Be sure to use the wide nozzle and low air for the engrave. It really does make a difference in engrave quality.
Once you have your stamp engraved, immediately wash it with a toothbrush to remove the residue.
Mounting Your Stamp
To mount my stamp, I cut out 2 clear acrylic pieces and glued them together with Weld On 16 acyrlic glue.
Then you will need to apply Tack-it Over & Over to the back of the rubber stamp and let it dry. Once it is dry, you can place the laser cut stamp on the acryic block.
Tips and tricks
If you are not happy with the stamps result, be sure you are applying the ink the correct way.
I really like this video showing how to get good results with your stamps. I was struggling making my stamped design look nice until I learned the proper way to ink a stamp.
Ideas for what to laser engrave on your rubber stamp
If you are looking for a lot of great fonts or designs to use to make your laser engraved rubber stamps, be sure to check out Creative Fabrica. You download as many files as you want with your subscription.
I have been using it and I love all the different fonts, and graphics I can get.
This is the file I that I used to create my stamps.
Never buy SVG files again with a Creative Fabrica Subscription.
How to store and care for your rubber stamp
I found this great article on how to store your rubber stamps.
Be sure to clean your stamps after use with warm soapy water. You can also use a stamp cleaner.
If you are looking for a fun project that doesn’t require too much time or effort, consider making your own rubber stamps with a Thunder Laser. You can get creative with the designs and make them as unique as you want. Plus, the process is very quick and easy so you can start using your new stamps right away.