
This post contains affiliate links. That means I may earn a small comision if you click on a link and purchase something. This cost you nothing. Read all the legal boring stuff here..
Are you looking for an easy and affordable way to create your own unique earrings? With just a few simple steps, you can make your own earrings from paper using a
Materials:
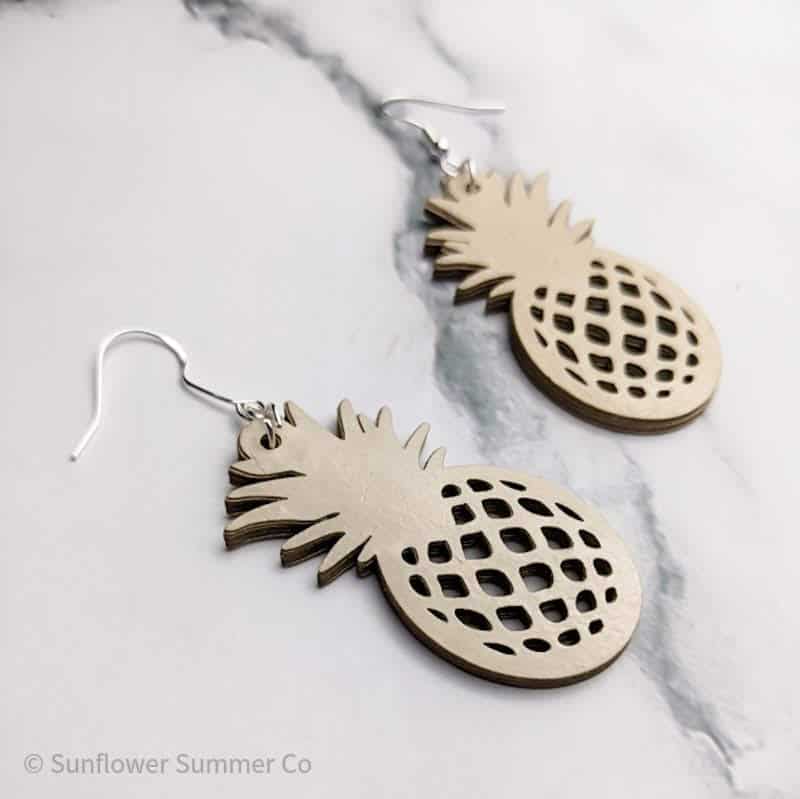
The first step in making your earrings is to choose the shape that you want to use. You will want to find an SVG file or even design one yourself. I choose the cute pineapple earring on Creative Fabrica.
I really love my Creative Fabrica Subscription to find cut files. They have tons of SVGs, fonts, and graphics you can download with your subscription. If you find yourself looking for lots of files, be sure to check it out!
I used the pineapple earring to make this tutorial.
Step 1: Choose your SVG and cut out your earrings
Once you have chosen the shape you want for your paper earrings, pull out your
Step 2: Glue the layers of your earring together
Count out 10 shapes for each earring and stack them on top of each other to help with the next step.
Working fast, take one of the shapes and apply a very thin layer of glue on one side. I use a foam brush and Elmer’s glue but you can use any glue you have.
You want to make sure you only apply a thin layer of glue so your paper doesn’t warp.
Then line up a second shape with the first and glue them together creating your first layer.
Keep layering the shapes until all 10 are stacked.
Step 3: Apply a sealer to your paper earrings
If you want sturdier earrings, you will need to use a sealer. A sealer will stiffen the paper, make it more durable, and create a glossy finish. You can use Mod Podge but I absolutely love this sealer. It says it is only for acrylic paint but I find that it looks and works much better than Mod Podge and I use it to seal many different things.
Apply a thin layer of the sealer with your paintbrush. Be sure to get the sides of the earrings. You might need to add a couple of layers to get the shine you want.
Be sure to let it dry on a flat surface before moving on to the next step. Your paper earring should feel very stiff after all the glue and sealer are dry.
Step 4: Adding the Earring Hook
Take a small jump ring and thread it through the small hole of your paper earring. Make sure that the jump rings are securely closed so that they don’t come undone when worn.
Add another jump ring through the first one but do not close it yet. I find adding the second jump ring allows the earring to face forward instead of turning sideways when worn.
Now add the earring hook and close off the second jump ring. And voila! You have now successfully made your own DIY paper earrings!
Check Out These Other Earring SVG Cut Files You Can Use to Make Paper Earrings
I used the pineapple earring to make this tutorial.
Making DIY paper earrings is an easy and fun project that anyone can do at home with minimal supplies and materials. The finished earrings would make a great handmade gift for friends and family, or just something special for yourself! All it takes is simple cutting, gluing, sealing, and adding jump rings and hooks. So get creative with your designs and start making beautiful personalized paper jewelry today!